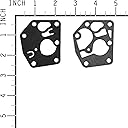
🔧 Elevate Your Engine's Efficiency!
The Briggs & Stratton 795083 Carburetor Diaphragm is a genuine replacement part designed to enhance the performance and reliability of your outdoor power equipment. This diaphragm kit is engineered for precision and compatibility with international standards, making it an essential component for maintaining your machinery's efficiency.


| ASIN | B0038U3IG2 |
| Best Sellers Rank | #454,308 in Patio, Lawn & Garden ( See Top 100 in Patio, Lawn & Garden ) #4,406 in Lawn Mower Tune Up Kits |
| Brand | Briggs & Stratton |
| Brand Name | Briggs & Stratton |
| Compatible with Vehicle Type | Lawn Mower |
| Customer Reviews | 4.7 out of 5 stars 2,108 Reviews |
| Global Trade Identification Number | 00024847624984 |
| Item Dimensions D x W x H | 2.36"D x 2.36"W x 2.36"H |
| Item Part Number | 795083 |
| Item Weight | 4.54 g |
| Manufacturer | Briggs & Stratton |
| Manufacturer Part Number | 795083 |
| Manufacturer Warranty Description | 90-days for defects in material and workmanship |
| Model Number | 795083 |
| Number of Items | 1 |
| Product Dimensions | 2.36"D x 2.36"W x 2.36"H |
| UPC | 704660056338 798256102714 024847624984 |
| Unit Count | 1 Count |
| Vehicle Service Type | Lawn Mower |
J**M
The Gaskets Worked to Fix My stubburn gas mower
Worked for my old Murray Lawnmower, It started right away after the gaskets were install and the carburetor was thoroughly cleaned.
J**.
Briggs Stratton Carburetor Diaphragm
Excellent diaphragm replacement that solves the leaking and hard starting or not running smooth Briggs engine. Gasket is made of quality material and installs easily in less than 10 minutes. Great replacement part
D**R
OEM gasket and diaphram
Fits and functions in my 4.75hp Briggs & Stratton WeedEater 22" push mower.
R**T
Great Carburetor
Easy to uy and install. Lawn mower runs perfect again.
B**E
Genuine article; not terribly expensive
I've ordered and installed a ton of these on B&S tank-mounted carbs. Genuine B&S part. Fixes a myriad of problems with tank-mounted plastic carbs. Install with rubber part against tank; cardboard part against carb body.
B**K
EZ Peazy....Now I know why they are not sold at the home improvement stores
Because nobody would need to buy a new mower. Gosh darn...a 1/2" socket and screwdriver and 10 minutes and my old yard goat is baaack. It is so satisfying to extend the life of a piece of equipment. First the wheels fell off and I fixed that. Once I was at the gabled roof store and saw a young associate or squirt, putting a mower together and I wanted to ask him if he was instructed to not tighten the bolts and doohicky things not too tight so that they would fall off after awhile and causing the customer to buy a new mower; but, I didn't since the fella looked a bit too emotional and I was afraid he would take it the wrong way. So, planned obsolescence or premature deterioration(the gas bulbs) are probably originated in the think tanks of wall street by social scientist paid to increase the bottom line of the titans of industry. I just don't know. I once read A motorcycle repair book while on Zen and it has stuck with me when I do mechanical activities. I can almost hear the screw threads speak to me and in this case the gasket material seemed quite adequate and joined in the oration, resulting in a perfectly running machine. I wish Amazon would allow more space for a complete review, but in todays world of instant gratification and everything hurry hurry hurry.... Stopping and smelling the fresh cut grass needs to be on everyones bucket list, right next to replacing gaskets...... grill cheeses are burning..
J**R
My mower now runs like new
This solved numerous problems with a free 20-year old “Southland” 3.75hp Briggs mower I picked up. No more surging, no more excessive fuel usage, no more pungent exhaust smell. It runs great. Installation was not too difficult - make sure to take your time and carefully remove your carb. Also be careful not to tear or misalign the gasket/diaphragm. There are lots of YouTube videos out there that show the process in detail.
L**W
Perfect. Must use original!!
Even if you don't have the original carb, i'd replace the after market part with this one. The aftermarket part wouldn't let the engine start. Replaced the diaphram and gasket on the after market carb, the engine started right up without and issue.
C**7
Worked perfectly and got my lawnmower running properly.
Fit perfectly. Easy to install and fixed my issue with black smoke out of the exhaust due to running rich. My old gasket/diaphragm had started to separate and was dumping excess fuel into the carburetor. It's now running better than it has for years.
J**N
original Teil für original Funktion
Nach erfolglosem Reperaturversuch mit einem Aftermarket Teil (Rasenmäher lief wie nen Sack Nüsse) schnurt er nach Einbau des Original Teils nun wieder wie neu.
N**T
Works as expected
Easy install, Mower is back like new
L**S
pièce conforme à moteur
correspond bien à notre tondeuse
P**P
A simple, cheap and effective cure for rough/rich running..
My cheapo Mountfield lawn mower was starting to run very rough. It started o.k., but then the engine "hunted" - would not idle properly, with clouds of black smoke periodically and trying to stall when cutting. Seemed like the governor was at fault! I pulled the spark plug - it was covered in black soot - running too rich? The air filter was clean and clear, I ran some carb. cleaner through the throat of the carb whilst running up the engine by pulling the governor spring gently. Still no improvement. The governor springs were all clean and moved freely - as did the governor arm by the fan (under the engine shroud). I was sceptical that a replacemnt diaphragm would cure this - but for the price, it was worth a go. It is best to remove the fuel tank from the mower first, with the carb. still attached. Just two bolts to undo, a rubber union hose to gently pull off and then tilt the tank to wiggle off the "Z" bend wire arm thingy from the governor - all of the springs etc. do not need to be touched - they stay on the engine. With the tank/carb. on the bench its easier to work on it. Empty the tank of any residual fuel carefully (safety) and might as well check its insides for debris/corrosion. Undo five set screws to remove the carb. body and withdraw it upwards - watch out for a long plastic pipe/filter and a short coil spring sitting on the old diaphragm! Might as well check the filter/clean it whilst its out of the tank. The old diaphragm looked intact - but somewhat stretched and floppy. Peel it off with the old gasket and fit the new diaphragm first - to the tank face, followed by the new paper gasket, then the carb. body - get it in the right order! Re-assembly is the reverse as before - but do up the set screws evenly to avoid harming the gasket/diaphragm. After re-assembly and some fresh petrol, the engine started immediately and settled down to its old sound and performance - job done. I suppose the old diaphragm was worn/stretched a bit and was allowing too much fuel to be pumped up to the carb? Anyway - for the price of this little kit, a very simple, easy and cost effective repair. Well worth doing.
Trustpilot
1 month ago
1 month ago