Desertcart purchases this item on your behalf and handles shipping, customs, and support to UK.
๐ Elevate your laptopโs GPU game โ because your workflow deserves a power boost!
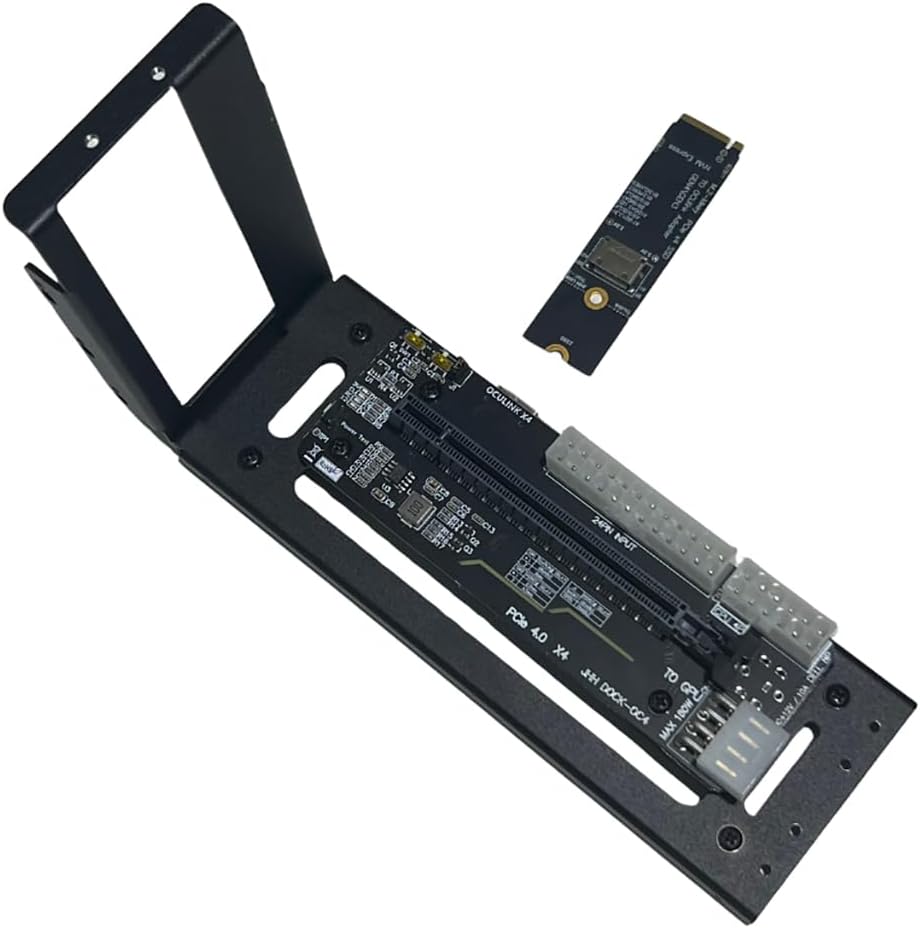
The JMT M.2 M-Key to PCIe 4.0 x4 External Graphics Card Stand Bracket is a cutting-edge adapter designed for professionals and power users. It enables laptops and handhelds with Oculink or M.2 NVMe ports to connect external PCIe cards such as GPUs, network, sound, or capture cards. Supporting PCIe Gen4 x4 speeds and flexible power supply options (ATX/SFX/1U 500W+), it delivers high bandwidth and stable performance. Its compact tabletop mount design and 90-95% compatibility with tested devices make it an essential upgrade for millennial managers seeking to future-proof their mobile workstations without breaking the bank.
| ASIN | B0CRR7HMX5 |
| Best Sellers Rank | 70,274 in Computers & Accessories ( See Top 100 in Computers & Accessories ) 357 in Graphics Cards |
| Brand | JMT |
| Brand Name | JMT |
| Colour | Black |
| Compatible Devices | Desktop, Laptops |
| Compatible Phone Models | Universal |
| Compatible devices | Desktop, Laptops |
| Compatible phone models | Universal |
| Compatible with Vehicle Type | ATV, Automobile, Truck |
| Country of Origin | China |
| Customer Reviews | 4.2 out of 5 stars 61 Reviews |
| Enclosure Material | Metal, Plastic |
| Global Trade Identification Number | 00783798005388 |
| Item Weight | 0.32 Kilograms |
| Manufacturer | JMT |
| Manufacturer Part Number | F51620 |
| Model Name | AMD Radeon RX 6800 XT |
| Model Number | F51620 |
| Mounting Type | Tabletop Mount |
| Mounting type | Tabletop Mount |
| Product Features | One-Hand Operation |
| Product Warranty | 1 |
| Special feature | One-Hand Operation |
| UPC | 783798005388 078379800538 |
T**6
Was apprehensive but it works well
Was initially a little apprehensive about this - I needed more vram for diffusion models, and didn't have a fortune to spend on a new gaming pc (I have a not so old MSI Raider GE76 12UH, but with only 8gb of vram). I'd only read about epgu's, and managed to snag a second hand RTX 3090 at a reasonable price. I decided to take the plunge. I plugged it all together, and turned on with always on switch on (I should note I was using a different m2 oculink card in my laptop) and booted up. Immediately device manager sees a generic windows display adapter. Reinstalled drivers, now device manager sees a RTX 3090, but stopped with error 43. Did some googling, and found and ran the error 43 fixer - did it's thing, but still reported the same error. Uninstalled and reinstalled the driver cleanly - still no luck. Went back to basics - tried swapping out my old m2 card with the one supplied in the kit. Booted up, and voilร ! RTX 3090 installed and working! Don't know if it was the card, the error fixer or a combination of both, but it now works flawlessly. I shut everything down, tried flipping the switch to auto power on when it detects power from laptop and guess what? that worked too! It might be cheap and cheerful, but I can testify it works, and am immensely relieved that it does as it saved me a fortune needing a new pc, or being stuck with a graphics card I can't use. Hooking it up together was simple - just connect the atx24 pin power connected to the board, your oculink cable in the relevant port, and your GPU into the PCI slot. Hook power up to your GPU directly. Not had a chance to test performance with games, but I'm sure people have already done that - I'm not using it for gaming, so the performance loss should be minimal and so far using flux it's a huge improvement on my own board 3080. It's a shame the kit doesn't provide a cable too, but the one shown in "people also bought this" section for another 20 quid worked just fine.
D**Y
Worked perfectly as described by others.
Buy the cable marked as people also bought and use m.2slot Might need 10mm motherboard stand-offs or longer threaded screws for the unit to fit graphics card, where screws connect the base plate to vertical plate, so you donโt need to bend the vertical plate. Other than that perfect.
D**G
Don't buy it
Does not power on. There's NO instruction at all, no cable that was shown in the image that include so you will have to buy it separately. Barely any information about setting it up online. Highly not recommended. I have tried all 3 working PSU, all 3 different GPU and none of them works at all. I have also tried to test switch (still nothing).
D**R
Good
Works well, brought this with the oculink m.2 port and cable as I didn't want the wire trailing from the pcie slot of the mini desktop. But of faffing as I havent used a gpu with linux before but all good.
A**I
Fa il suo mestiere
Fa il suo mestiere. Su schede modeste come 4060Ti non crea neppure particolari colli di bottiglia. 3dMark ottiene punteggi pari al bus gen4 8X nativo
A**D
excellent
works for an intel arc b580. watch out for dust if unmoving
G**K
It is actually far better than expected
Replaced a PCI-e 3.0 dock with this one to be able to run an RTX 3060 Ti. The other dock had a very cheap plastic main plate and only some extended screws for support. This one has far better build quality and is much more stable. The magnetic legs add the cherry on top. Put some metal plate underneath and it will stick there like being glued to the ground. The 3060 runs without issues reaching benchmark scores comparable or superior to desktop builds. The cabling of the 3.0 dock caused some WiFi intereference which yielded poor results (20-50Mbs on a 250Mbs WiFi card), the oculink cable doesn't cause anything like that. The only thing that I could mention as negative that the oculink cable's plastic cover is quite big and to be able to put it the backplate of the laptop back properly I had to remove it.
M**.
Inexpensive and works, I'm an Oculink believer now.
Works. Nice that includes the m.2 Oculink adapter. Be sure to buy an Oculink cable. I have a mini PC that only has (1) M.2 PCIE x4 4.0 slot, so I had to clone my MVME to SATA drive. Comparing FPS with games that struggled, it's apparent that Oculink > USB4/TB4. I wish this had a Power supply mount, and that the Oculink port was more accessible towards the bracket of the graphics card. The power switch on Auto didn't work, so I toggles it to On. Works like a charm. There's potential to 3d print an enclosure. Install notes: ONLY plug your power supply to the 24-pin connector (check/green). DO NOT connect power to the connectors circled in res (X/red). If your GPU requires PCI-E power, plug those power supply cables directly to the GPU power connectors (not dock).
K**K
ไธ่ฌใฆใผใถใผๅใใงใฏใใใพใใ
ใใฎๅๅใฏ่ชฌๆๆธใไปๅฑใใฆใใใพใใใใพใๅบ็คใใใใใซใใ้ปๆบใไธๅฎๅฎใงใใ็งใฏใใฎๅๅใงrx6600ใ่ตทๅใใใจใใใทใงใผใใใๅคง้ใฎ็ ใๅบใพใใใ
Trustpilot
1 month ago
4 days ago