


Buy anything from 5,000+ international stores. One checkout price. No surprise fees. Join 2M+ shoppers on Desertcart.
Desertcart purchases this item on your behalf and handles shipping, customs, and support to UK.
🎮 Level up your Switch’s style game with Sakura Pink flair!
The eXtremeRate Soft Touch Grip Back Plate is a precision-crafted replacement shell kit for the Nintendo Switch console and JoyCon controllers. Featuring a stylish Sakura Pink matte finish, it includes all necessary buttons, screwdrivers, and spare screws for a full DIY upgrade. Designed for perfect fit and original functionality, this kit lets you personalize your gaming device while enhancing grip comfort and protecting against wear.


| ASIN | B07NVMXNM8 |
| Best Sellers Rank | #12,434 in Videogames ( See Top 100 in Videogames ) #415 in Nintendo Switch Controllers |
| Item model number | QP306 |
| Manufacturer | Extremerate |
| Product dimensions | 16.5W x 11H centimeters |
O**R
Be Careful with the screws
Not bad, looks nice after putting it on my switch.. unfortunately one screw hole was damaged so some parts were wriggling inside.. had to put back my original right joy con back cover.. so now my switch is all pink except for my right joy con Which has the original red color on the back..
C**R
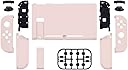
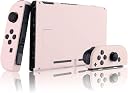
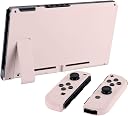
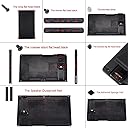
I wanted to create my own custom Sailor Moon themed switch so when I found this pastel pink kit I was so happy(stickers were purchased by me on Etsy). I’m super impressed with the quality and the finished look. I also purchased the white button kit from them. My experience with installation was very good. I had no issues whatsoever. So with that in mind here are a few tips: 1. Use your own tools. Yes, the kit comes with the screwdrivers you will need. But they’re not very good. You can get a set of small screwdrivers, as well as the special Nintendo screwdriver right here on amazon. You will need the “switch screwdriver” as well as a ph000 screwdriver. I cannot stress this enough. Using the ones that come with the kit will very easily strip the screws as you’re trying to get them out. 1a. While on the topic of screws, pay attention to the screws you’re are removing and make sure you’re using the correct screwdriver. Some are “y” shaped. These will require the special Nintendo screwdriver. 2. TAKE YOUR TIME. This is not a quick project. If you’re in a rush to get it done, you will make mistakes and possibly damage something. This requires a patient and delicate hand. DO NOT OVER TIGHTEN THE JOYCON SCREWS as you’re putting it back together. This could not only damage the delicate parts inside but also mess with button function. 2a. If you do strip a screw the tiniest bit, but you manage to get it out DO NOT reuse that screw. Replace it with one of the screws from the kit. 3. FOLLOW THEIR VIDEO. The video is very detailed and well done. My suggestion here is to change the playback speed of the video to .5x. At original speed it’s a bit too fast to follow. I paused after each step to make sure I was doing it correctly. If possible watch the video before you even begin just to get a feel for the whole process, then begin your installation. 4. Pay attention to the screws as you are removing them. There are many different lengths used. I used little paper cups to put the screws in as I removed them step by step. So I had several little cups to keep the screws I removed sorted. 5. Some screws might give you a little bit of a fight. BE PATIENT WITH THESE. Nintendo doesn’t want you getting up in there so some of the screws have what looks like a tiny bit of tread glue. So you’ll have to “break the seal”. Again, be patient and careful. The last thing you want is a stripped screw as you’re trying to remove parts. This is where having proper screwdrivers will come into play. 5a. This also goes for some of the internal parts of the JOYCON that will need to be removed. For example, the little vibration element is taped down, as well as the battery. It’s not hard to remove them at all. Just be aware that they are taped down. 6. Get a good pair of tweezers! This was insanely helpful. Not only in disconnecting the ribbon cables, but also in getting out and putting some of the smaller buttons back in. This last one is about the casing itself. Because of the satin/matte finish the casing could very easily get dirty or scuffed. I opted to purchase a clear protective shell to ensure neither of those things happen. I also knew I’d be adding stickers so I wanted to keep those clean and safe as well. Personally, I like the look of the clear protective shell. **EDIT** MAKE SURE TO READ THE DESCRIPTION ON THEIR INSTALL VIDEO. THEY MADE A SMALL MISTAKE IN THE VIDEO WITH THE ZR BUTTON RIBBON AND THEY CLARIFIED THIS IN THE DESCRIPTION OF THE VIDEO** I think that is about it. I’m very happy with my purchase and the final result.
A**A
This product is wonderful and SUPER easy to apply! The smooth casing is so soft to the touch and the color (I got Sakura Pink) is beautiful! It is slightly a darker shade and on my left joycon, one area is sliiiightly misaligned but but that's my OCD. Tips for the newer model: ❌ YOU DONT HAVE TO REMOVE EVERY SCREW. When replacing the back of the switch, you dont need to unscrew the 5 black screws where the joycons slide in! Save yourself stress and stripping them (like I did) by just leaving the sides alone. ✅ BUY A DIFFERENT Y-SCREWDRIVER. I cant stress this enough. The one it came with is not adequate. I stripped at least 4 screws and had to use the replacements they send you. I got one for $5 on Amazon. SPEND THAT EXTRA MONEY. With the new one, I was easily able to remove screws. ✅ KEEP AN EYE ON WHERE YOUR SCREWS GO. They are so many sizes and it's hard to keep track. I drew out a map of where to put them since I didn't want to not know where one goes. ✅ DONT BE AFRAID TO PULL UP THE BATTERY OR THE SENSOR AREA ON THE BOTTOM OF THE RIGHT JOYCON. There is strong tape there and all you have to do is put some gentle muscle into it. I was afriad of breaking anything so I went particularly slow. You dont have to go snails pace, but just be careful for the wires. ❌ DONT JUST GO WITHOUT DOUBLE CHECKING WHERE YOU REPLACE EVERYTHING. I did at ome point on the joycon and something came loose. The buttons are hard to get to stay at times and if something feels not 100% secure, DOUBLE CHECK. These are just tips and honestly, I didnt use any tutorial or video to put mine on. I'm not a mechanic, but common sense and keeping track of what you take apart is all you need. Watching the video for a second made things more stressful (and made me remove screws I didnt have to) then just working on it myself. Be observant, inspect what goes where, and expect AT LEAST 2 HOURS of working on it. I did it slowly over 2 days and the results came out beautiful! ⭐⭐⭐⭐⭐ P.S. The white buttons I purchase from the same company here on Amazon and they are PERFECT!
T**H
10/10 would recommend, and I will definitely be buying from them again. Made my custom controllers with white buttons and it looks amazing, their quality of products is soooooo good. The only reason I have ease of install 4/5 stars, was because things do get a little bit finicky with everything being so small. Also, a problem I kept running into (through no fault of extremerate), was that the original screws kept threading and were a nightmare to get out.
R**W
Putting on the backplate was incredibly easy and simple. I did not use the included tools and used my own. Being firm and careful I was able to avoid stripping any of the very very delicate screws. If you are twisting and the screw is not turning you're ruining your screws. The material itself is very soft, the kickstand provided seems to be better than the Nintendo original kickstand which was flimsy. Not only does my switch look better but I feel better knowing that the kickstand is more solid now, not that I use it much. For the Joycons the installation is not at all as challenging as some reviewers make it seem. Yes it is very fiddly, yes it will take some time due to the ribbon cables which are very delicate, but it will not go awry if you are patient and gentle. Removing the Zr and Zl triggers is the hardest part of the install simply due to the fact that I was exceptionally gentle and did not wish to damage any parts, they do require a bit of strength to get them out so keep that in mind. Overall a happy purchase :)
O**A
Bei mir passt die Hülle super und alles lief super. Verfärbungen oder ähnliches habe ich bis jetzt auch noch nicht bemerkt. Ich habe mir für den Umbau viel Zeit genommen und ich finde es echt komisch, dass Leute hier behaupten das sowas kein Anfänger Ding sei. Ich habe mir einige Videos und Foren Einträge angeschaut und es war super einfach die Joycons damit umzubauen. Die Konsole selbst war am einfachsten und die Joycons sind halt etwas friemelich aber überhaupt nicht mega schwer. Ich hab das jetzt auch insgesamt drei mal gemacht und es lief alles super. Man sollte einfach Geduld haben, ruhig bleiben und sich vorher das richtige Equipment besorgen. Youtube hat wie gesagt etliche Videos und auch so findet man etliche Erklärungen in Foren oder anderen Webseiten. Das als fortgeschritten zu betrachten ist meiner Meinung nach ziemlich übertrieben. Ich habe es mir viel viel schlimmer vorgestellt als ich die Kommentare hier laß aber jetzt kann ich nur darüber lachen.
Trustpilot
2 weeks ago
1 month ago