Desertcart purchases this item on your behalf and handles shipping, customs, and support to UK.
๐ฑ Turn kitchen scraps into garden gold with the VermiHut Classic โ composting made smart and stylish!
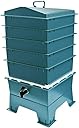
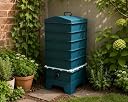
The Original VermiHut Classic Model 5-Tray Worm Composter Bin is a high-density polyethylene, stackable vermicomposting system designed for indoor and outdoor use. With a compact 16"x16" footprint and 50-liter capacity, it efficiently processes up to 5 lbs of food waste daily using 10 lbs of composting worms. Its advanced airflow and moisture control features ensure an odorless, low-maintenance environment, while the continuous flow design simplifies harvesting nutrient-rich worm castings and collecting worm tea for organic gardening.
| ASIN | B018RU0BAS |
| Best Sellers Rank | #152,137 in Patio, Lawn & Garden ( See Top 100 in Patio, Lawn & Garden ) #93 in Outdoor Composting Bins |
| Brand | VermiHut |
| Brand Name | VermiHut |
| Capacity | 50 liters |
| Color | Dark Green |
| Customer Reviews | 4.6 out of 5 stars 802 Reviews |
| Item Dimensions L x W x H | 16"L x 16"W x 27.5"H |
| Manufacturer | VermiTek |
| Manufacturer Part Number | G900203DG |
| Material | High Density Polyethylene (HDPE) |
| Material Type | High Density Polyethylene (HDPE) |
| Model Number | G900203-DG |
| Number of Items | 1 |
| Product Dimensions | 16"L x 16"W x 27.5"H |
| Shape | Rectangular |
| UPC | 714119421297 |
L**C
Good product. Excellent Customer Service. Best value worm farm on Amazon
I started worm farming using a DIY 5 gallon bucket with instructions from youtube videos. Using the Vermitek worm farm brings my hobby to another level. I had the Vermitek worm farm for about a month. I am completely satisfied with the quality of the product. My sister has a competitor product and the Veritek bins are much sturdier. The instruction manual is well written with lots of good tips. IMHO this is simply the best value worm farm on Amazon. There's a lot to love using the Vermitek product vs. a 5 gallon bucket: 1) There is so much more surface space using the bins 2) With not much more vertical space I can have 5x more worms vs. a single 5 gallon bucket. 3) The Vermitek worm farm looks so much better than a bucket with random drilled holes! 4) It is so much more convenient and much cleaner to work with the worm bins. 5) Harvesting worm castings is so much easier with minimal amount of work with the Vermitek. See suggestions below. My order came with missing instruction manual. I found the vermitek web site and email the seller. I got a phone call from the seller the next day and got the instructions needed. Customer service was excellent! Talking to the seller I took the opportunity to purchase additional accessories from the seller's website. I guess the prices are so low for the accessories that the seller don't list them on Amazon. For example the coco coir mats are less than a dollar. Other accessories I found useful and I wish the seller would sell as a bundled extra: the plastic claw for moving worms castings around, extra coco coir brick, moisture and temperature meters. If you order extra worms from the seller you can easily get to having free shipping with their order minimum. Some suggestions using the Vermitek worm farm: 1. As others noted Fruit flies may be an issue with the unscreened holes in the top cover. However I had no issues with fruit flies by using a few layers of damp paper on top of the worms in the top bin. 2. I use a spray bottle to keep the worm farm damp but not wet. I only spray water on top of the layers of newspaper I use. The farm is never wet enough to have much "worm tea" drop to the bottom spigot bin. 3. For the worm food when adding "greens" (vegetable scrapes etc.) also add "browns" (damp newspaper, coco coir etc.). Your worms eats both plus a good ratio and greens and brown will keep your worm farm smelling fresh. 3. What I did to migrate worms to a new bin: instead of adding new bin with new bedding + food on top of the existing bin I added a new bin below the existing worm bin by using a coco coir mat. b) I moved some casting and worms (about a third to a half) from the existing bin and pushed them to one side of the new bin so that the top of the casting/worms from the new bin touches the bottom of the existing bin c) I had cut out a few pieces of scrap wood and use them as spacers to prop up the bin so that it sits evenly when the old bin is put on top of the new bin d) on this side of the new bin add worm food, more coco coir + damp newspaper and, move a few wigglers over to the side e) For the old bin, I pushed the worm casting + worms to the side touching the bottom bin side with casting. With this the worms will migrate (drop) down to the new bin leaving the old bin with just the worm casting. f) Continue to add new worm food just in the new bin only. I think this is easier way to move the worms to a new bin and harvest the casting especially if you are using a coco coir mat as a base for the new bin. I will take some photos next time I do this and will post them.
C**N
So much easier to use than my old compost bin
I inherited a worm bin from a friend who moved away. She had built it by drilling holes in some large storage containers. I started having more and more worms escape though, to the point where our basement floor was daily covered in dying worms, and they were making their way to other rooms in the basement. I did some research and found this design, which I really liked so far. I especially like how you can stack layer after layer, so you can rotate the worms without have to sort worms from one side of a bin to the other, etc. The fact that it's elevated and has a tap on the bottom to drain the tea out is great so you don't have to lift things around and make a mess trying to get the tea out. I followed the tip for filling the top tray with shredded paper to keep flies from being able to reach the surface of the rotting foot, and also to keep any smell down. This means four usable trays instead of five, but it's well worth the trade-off of no flies and no smell! One thing I don't like so far is having to wait long enough for the worm eggs to hatch before cycling out the lowest tray of compost. I feel like this could eventually be the main limit on how fast the compost could be cycled through. Unless you don't care about growing your worm population over time. Maybe a solution to this is set the old waste aside for a month or two in another container until the eggs have hatched so you can collect those worms before using the compost. This way you can keep cycling through the trays in the composter while in the meantime not loosing your next generation of worms!
K**N
Love my VermiHut! No stink! Definitely recommend!
I bought this particular bin for 2 reasons. 1) It was one of the cheaper priced worm composters 2) It had 5 trays so I knew I would have room to grow into it. I am not disappointed in my purchase at all! It came a few days later than the original ETA which stressed me out a little because the worms ended up coming early so I didn't have a home for them for 24 hours. This hut was so easy to put together and the little manual that comes with it is perfect and extremely useful. Although, the manual states that it comes with a coconut fibre mat, mine did not which is fine, I just covered the bed with wet newspaper. I put it together as instructed and it has you put the drain cloth over the drain bin before setting in the first tray. I don't particularly like the cloth hanging over the bin but I highly recommend it. I have lifted the tray a couple of times and have found tons of worms in the drain cloth. They would normally end up in the drain bin and possible the drain spigot so this cloth has kept them from clogging things up downstairs. I followed this instruction in the manual of using the coconut coir, shredding newspaper, and adding compost for the worms to start their bed. However, when feeding them, I put food in one corner instead of all over the bin. This helps me check how much food is actually being composted and how quickly. When they are nearly done with one corner I move onto another corner. Saw this in a couple of YouTube videos so that is where I got the idea. ***Important note - If you use your normal paper shredder to shred your newspaper, make sure your shredder blades are completely cleaned of any other debris. I didn't check and ended up with strips of plastic from junk mail and windowed envelopes so I periodically pick these out of the composter. Would hate for my worms to choke on plastic! I keep the bin in my kitchen and there is absolutely no foul smells coming from the hut and my two big dogs don't even pay attention to it. I enjoy having it close by so I can check on them and see how things are progressing. Depending on how things go, I may buy another hut in the future and would definitely get the same one. My only wish is that this hut came with a trowel/rake so that I could move the worms and compost around inside. I am too scared for now to touch the worms and have been using a fork to maneuver things. I'll be buying a plastic one soon so I recommend you do as well when making this purchase. - Katherine
C**E
Great Worm Bin for Beginners
I'm very pleased with this worm bin. It's a great size with plenty of room to grow as the worm population increases, and it has worked exactly as I hoped. My worms stay where they're supposed toโI've had no problems with them escaping. It's well designed, easy to use, and I'd definitely recommend it to anyone interested in vermicomposting.
T**R
I love this thing so much, with some adjustments.
I do my vermicomposting a little differently than most, and it's helped me have a lot of success with this thing. I was harvesting the bottom tray every month, now it's become every two weeks. First off, what you need to consider about stacking-bin systems is that by the time you fill up the top tray, there is a LOT of weight on the bottom tray. That's no good for the bottom tray or anything except the top tray, because the compaction wrecks any chance you have of oxygenation in any tray but the top one, maybe the one underneath. The quick and easy solution to that is a spacer in all four corners, maybe two or three inches long. I use PVC because I don't care about plastics leaching out, I've got enough to worry about in my life. If you're worried, you can use wood blocks and replace them when they rot, that's fine with me. The important thing is that no tray gets compacted by the trays on top of them. Second thing I do for success; the bottom tray contains about two inches of dry peat. So does the top tray. These never get used for worms (and worms won't even try to enter the top tray, because it would kill them.) The bottom tray is to soak up any drippage that comes from the above trays. Sure, worm leachate is great, but you know what else is great? Not having to deal with stinky, anaerobic drippage. i've got a full time job and a worm bin in my kitchen. I only have so much time for worm-farm drama. Oh, and that top tray of dry peat? That's why I have zero fruit flies. Hey fruit flies, want to get at the old bananas and the watermelon rinds in my working tray? Well have fun burrowing through the two inches of dry peat on top. Oh, you can't, because you're fruit flies and you can't use tools? Sucks to be you. Be born with thumbs next life, you'll have an easier time. Final thing that works really well for me: I don't play with burying my scraps. I see youtube video after youtube video of people burying their scraps in a clockwise or counterclockwise method, digging through the half-rotten food and trying not to murder or freak out their worms while they're doing it. That's cool if that's what they like doing, but that just seems...difficult. And dirty. What I like to do is hydrate a little bucket of peat or coir, whatever I'm using for bedding, the week before I feed. All the vegetable scraps, tea leaves, and coffee grounds get tossed in a bucket throughout the week, and when I feed, I dump a little pile in one spot in the bin. Then I grab a couple handful of peat that's about the consistency of potting soil, and use it to cover the pile I just dumped. Repeat weekly. It means I don't have to dig through anything, ever. When three bins are full, I harvest the bottom one (not the peat one, that never moves--the one above it.). Also, when it comes to harvest, I don't like to murder worms who were too dumb to leave the poo-bin, but I'm also not gonna cook them a steak and give them a backrub while I meticulously hand-sort them from the poo. So the way I harvest is to take the peat-bin off with the lid, put it aside. Then put the harvest bin up on top, fluff it up so it's easy for stragglers to run down, and start harvesting handfuls from the top. Since the worms hate light, they run for the bottom, and by the time I get it all out of the bin, they've disappeared into the bin below it, and I don't have to play around with them. That's about all I have to offer, tip-wise. Anyway, point is, this bin makes me so happy. It never stinks and it produces a lot. I bought it in April and I've had a good time with it.
G**.
Put it Once, Use "Forever!"
This is an amazing "tool" for your garden. 1. Setup (5-star) : A. It is super easy to assemble. Just put the legged tray up on a level surface, cover with white strainer; layer over a cloth worm spearator; add a worm tray. DONE! B. Get some shreeded paper, wet it and layer it over the bottom of the worm tray. Get some worms and add them to the tray. (Weigh your worms first!). Add about the same weight of food scraps as you got worms. Cover with the top. C. Check periodically for the food layer to stay wet. Add food (Peferabbly milled down to smaller bits) weekly to one corner of the tray at a time. Check for "tea" collected in the bottom bin periodically. Collect the tea to dillute for your plants watering needs. D. Once tray is about 2/3rds full add your second tray on top and repeat step B, mind that worms will migrate into upper tray themselves, but you are welcome to relocate some by hand too! E. Once you are on your tray 3 or 4. check your bottom tray - it should be by now all black and more or less uniform or crumbly to be used as soild additive. Check to see if you have any worms left and throw them in the top tray if you do. Toss the new compost-soil to the garden/pots where it is needed. Sturdiness (4-star): As your compost bin fills up it becomes top heavy and the legs may spread out. So, just keep an eye out for water collection bin to be emptied regularily and for the soil (bottom worm bin to be emptied at least annually as well. 3. Easy to use (5-Star) Setup is super easy; use is super easy; maintenance - super easy; best of all - you got worms once and they will overwinter and re-appear in the spring! Happy Wormposting Everyone!
L**E
Real black gold
I got this up and running by the 1st of June. It is just 5 days into September and I have real castings to use as compost in my garden, starting off with approximately 1,100 red wrigglers. Assembly is a breeze. The unit is stable (I have an 85+ pound dog who knocks it sometimes), and hasn't knocked over, nor is it difficult to move. I keep mine indoors. Not only has this been a great addition to our gardening routine, the end result pays for itself. I use shredded cardboard paper as browns, and the proper scraps for feeding. The only additional cost along the way is using eggshell powder for worm health and to keep the PH right, and a sifter for when I was ready to harvest. I don't let an entire tray finish before I sift, which is my preference for use. You can go on social media and get tons of advice for making this work for you. Yes, out of 1100+ worms, a few escape. If you have a bin where you have mass escapes, you're doing it wrong. Also for anyone reading this and thinking about the benefits of the worm tea catch bin... If you catch any liquid in the bin, you're doing it wrong - and that's not worm tea. My catch bin gets a few castings at best, and so far only two worms found their way into the catch. Does this work? Absolutely yes. Is the catch bin for "worm tea" misleading? ABSOLUTELY YES. However, I think it's a marketing plot for people like me who just wanted to jump into vermicomposting. Would I buy it again over at her home-made, cheaper alternatives, or a 3-tier system? No - the Vermihut is a solid choice and I WISH I had room for me. I love the Vermihut!
L**A
it does not take up much space and it really does look like earthworms like it
We are loving the earthworm care experience. This product is quite interesting, it does not take up much space and it really does look like earthworms like it. There is no smell in the house, in our case we put it in the kitchen, because it is easier to put the food. I do not really like the colors, I think they could produce colors that would fit better in the house, like white, blue, yellow, lime green and red. I think it would be interesting to come with tips on how to take care of the worms, and the manual is not as clear as riding. For example, a white cloth came and we do not know what it is for. The product is easily assembled by anyone. It pays to buy it, although to be expensive, in time you have realized that it is very worthwhile. We have already been able to divide the worms into 4 spaces. Another problem that I identified is in the docking of the platforms, for example a limit was not placed in the inner corners, so this causes the earthworms to be half-pressed. Overall this product deserves 10 rating, it's worth buying and your family will be happy. * Please, create more interesting colors and desgner, is the tip that I leave.
A**R
Great for kids
First time trying to farm worms. So far after 3 weeks it has worked perfectly. The worms are happy not trying to escape. My 3 year old loves it he takes the lid of and watch the worms 10-15 times a day!! Once the population gets higher will see how it goes. I started with around 250 worms.
M**K
Poor correspondence from supplier
The worm box looks great, however, when I ordered it, I wasn't aware the shipping cost was going to be greater than the product. My CC company sent me an email seconds after I clicked on the order button but the amount seemed more expensive than I expected. I thought that perhaps I ordered 2, but, after reviewing my order, I noticed the expensive shipping. I immediately contacted the supplier explaining that due to the shipping it made the product too expensive for my grandson's birthday present ( I have 7 grandchildren and can't afford that amount for each of them) and that I would appreciate them stopping or cancelling the order. They didnt' reply and the product was shipped. I realize that I should have paid more attention to the price before finalizing the purchase, but, the 2 minutes it took for me to attempt to cancel the order should also have been addressed. Either in an email or call. $250 is a lot for a worm farm, others are for sale, including shipping, for far less. Based on their lack of response, it is good that the product wasn't damaged or at least met the quality that it was presented. Note - Look at other options first as this will likely be the most expensive worm farm you will buy.
Trustpilot
2 weeks ago
1 month ago